
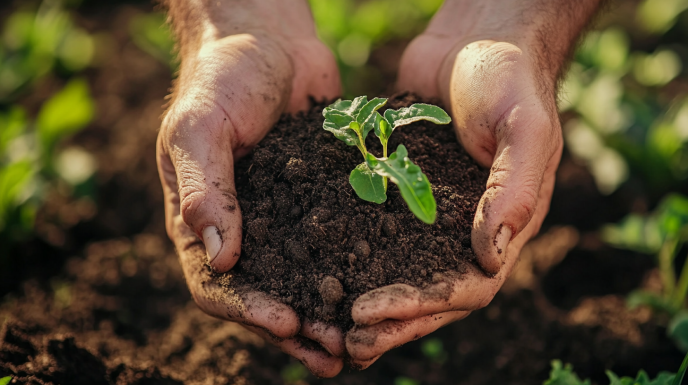

Expert Gardener Top Soil, 0.75 Cu ft 100% Organic
- Nutrient-rich soil: Packed with essential nutrients to support healthy plant development.
- Perfect for gardening: Ideal for all types of gardening, from flowers to vegetables.
- Organic matter: Contains natural organic materials to boost soil vitality.
- Improved soil structure: Enhances aeration and drainage for healthier roots.
- Moisture retention: Helps retain moisture, reducing the need for frequent watering.
- Ph-balanced soil: Perfectly balanced pH for a wide variety of plants.
$2.58

Scotts Premium Topsoil, Lawn and Garden Soil Conditioner, With Peat Moss, 0.75 cu. ft.
- Scotts® Premium Topsoil Lawn & Garden Soil Conditioner adds sphagnum peat moss and organic matter to your existing soil
- This bagged topsoil is for in-ground use to help prepare lawns for seeding or to amend soil in new and existing gardens
- To use as lawn soil, spread 1-2 inches of topsoil onto your lawn area, mix into the top 1-2 inches of native soil and level, seed, then water thoroughly
- To use as gardening soil for existing gardens, apply 1-2 inches of topsoil, spread and gently mix into native soil; For new gardens, apply 2-3 inches of topsoil, mix into top 6-8 inches of native soil and level and water thoroughly
- One 0.75 cu. ft. bag of Scotts® Premium Topsoil Lawn & Garden Soil Conditioner covers 4 sq. ft. when applied in a 2-inch layer
$2.97
As the spring sunshine warmed my face last weekend, I found myself standing in my backyard, coffee in hand, surveying what can only be described as a gardening disaster zone. The sad remains of last year’s tomato experiment, patches of stubborn clay soil, and weeds that seemed to be the only things thriving made me realize something had to change. After years of garden disappointments, I finally discovered the foundation of my problems was quite literally the foundation itself – my soil.
That’s when I embarked on my journey with Expert Gardener Topsoil, and let me tell you, it’s been nothing short of transformative. Whether you’re a seasoned green thumb or just starting your gardening adventure, understanding what’s beneath your plants is absolutely crucial. The quality of your soil determines 90% of your gardening success, and this realization changed everything for me.
In this comprehensive guide, I’ll take you through everything you need to know about Expert Gardener Topsoil – from what makes it special to how to use it effectively across different gardening projects. I’ll share my personal experiences, calculations for how much you’ll need, and insider tips I’ve gathered from both successes and failures along the way. So grab your gardening gloves, and let’s dig in!
What Exactly Is Expert Gardener Topsoil?
When I first encountered Expert Gardener Topsoil at my local garden center, I’ll admit I was skeptical. Another soil product with fancy marketing, I thought. But after researching and using it extensively, I’ve come to appreciate what sets it apart.
Expert Gardener Topsoil is a premium soil mixture specifically formulated to provide an optimal growing environment for a wide variety of plants. Unlike basic dirt you might dig up from your yard, this topsoil is carefully processed to create a balanced medium that supports healthy root development and plant growth. It’s essentially the uppermost layer of soil – the most nutrient-rich portion that plants love to sink their roots into.
What makes it unique is its consistency and quality control. Each bag contains a carefully balanced mixture that maintains proper texture, drainage capabilities, and nutrient availability. The soil has been screened to remove debris, rocks, and unwanted materials that might impede root growth or cause drainage issues.
I remember opening my first bag – the rich, earthy smell immediately struck me, and the texture felt light yet substantial between my fingers. Unlike some bargain soils I’ve tried that resembled dust more than anything, this had a pleasant, crumbly structure that spoke of quality.
The Benefits That Transformed My Garden
After using Expert Gardener Topsoil across various projects over the past two seasons, I’ve noticed several key benefits that make it worth considering for your garden:
Enhanced Soil Structure
The most immediate benefit I noticed was how it improved my garden’s overall soil structure. My backyard has patches of stubborn clay that either turn brick-hard in summer or become waterlogged swamps after rain. Mixing in Expert Gardener Topsoil created a more balanced soil structure that:
- Allows roots to penetrate more easily
- Retains moisture without becoming waterlogged
- Promotes better aeration for root respiration
- Creates pore spaces that beneficial soil organisms thrive in
Improved Nutrient Content and Availability
While not heavily fertilized like potting mixes, Expert Gardener Topsoil provides a good baseline of organic matter and nutrients. I’ve found this creates a more sustainable growing environment where:
- Plants have access to a moderate but consistent nutrient supply
- The soil ecosystem can develop naturally
- Additional fertilizers can be added as needed without risking overfeeding
- Soil pH is more balanced compared to my native soil
Better Water Management
Perhaps the most dramatic improvement I’ve seen is in water management. Before using this topsoil, my garden would either flood or dry out completely depending on the weather. Now:
- Water penetrates more evenly throughout my beds
- Moisture retention has improved significantly
- I’ve reduced watering frequency by nearly 30%
- Puddles after heavy rain have become a thing of the past
Weed Suppression
One unexpected benefit I’ve enjoyed is reduced weed pressure. Because Expert Gardener Topsoil is processed and cleaned, it contains fewer weed seeds than typical garden soil or cheaper topsoil options. This has meant less time pulling weeds and more time enjoying my garden.
How Expert Gardener Topsoil Differs From Regular Soil
Having tried numerous soil products over the years, I’ve developed a keen eye for what makes a quality growing medium. Expert Gardener Topsoil stands apart from regular garden soil in several key ways:
Consistency and Quality Control
Unlike the soil in your backyard, which might vary dramatically from one spot to another, Expert Gardener Topsoil offers consistency. Each bag provides the same reliable medium, making it easier to predict how plants will perform. My native soil ranges from sandy patches to heavy clay within just a few feet – trying to create uniform growing conditions was a nightmare until I started using a quality topsoil as a base.
Screening and Processing
One afternoon last summer, I conducted a simple experiment. I took a cup of my garden soil and a cup of Expert Gardener Topsoil and spread them side by side on white paper. The difference was striking – my garden soil contained small rocks, sticks, and various debris, while the Expert Gardener product was uniform and clean. This screening process:
- Eliminates obstacles to root growth
- Provides a more aesthetically pleasing finished garden
- Creates a more workable medium for both hand tools and roots
- Reduces the chance of unwanted materials in your garden beds
Balanced Properties
Finding the perfect balance between water retention and drainage is the holy grail of gardening, and this is where Expert Gardener Topsoil really shines. Many cheaper soils lean too far in one direction – either holding too much water or draining too quickly. Through trial and error, I’ve found Expert Gardener provides that goldilocks zone where:
- Soil remains moist but not waterlogged
- Roots can access both water and oxygen
- Beneficial microbes can flourish
- Plants experience less stress from water-related issues
Ready to Use
Unlike raw soil from your yard, Expert Gardener Topsoil comes ready to use. This saves considerable time and effort when starting new projects. Last spring, I created two identical raised beds – one using amended backyard soil and one using primarily Expert Gardener Topsoil. The difference in preparation time was substantial:
- Backyard soil: 3+ hours of digging, sifting, and amending
- Expert Gardener bed: 30 minutes to fill and plant
The convenience factor cannot be overstated, especially for larger projects or when gardening time is limited.
Where to Buy Expert Gardener Topsoil
Finding quality topsoil used to be a challenge, but Expert Gardener products have become increasingly available. I’ve purchased it from several sources and can offer some guidance on where to look:
Retail Stores
The most convenient option for most gardeners will be large retail chains. I’ve consistently found Expert Gardener Topsoil at:
- Walmart (typically the most reliable source and often the best price)
- Home Depot (seasonal availability)
- Lowe’s (seasonal availability)
- Local garden centers (prices may be higher but sometimes offer sales)
Online Options
While heavier to ship, topsoil is increasingly available online. I’ve occasionally ordered it when preparing for large projects:
- Walmart.com offers delivery or pickup options
- Amazon carries Expert Gardener products, though often at a premium
- Specialty garden websites sometimes carry it or comparable alternatives
Bulk Options
For very large projects, I’ve found that buying in bulk makes more sense financially and environmentally (fewer plastic bags). Some options include:
- Garden centers that offer the same product in larger quantities
- Landscape supply companies that might carry similar professional-grade topsoil
- Delivery services that can bring a truckload directly to your property
Pro tip: I’ve learned to stock up during end-of-season sales when prices can drop significantly. Properly stored topsoil keeps well for the next season, and I’ve saved up to 40% by purchasing in October for next spring’s projects.
Cost Considerations: Is It Worth the Investment?
Let’s talk dollars and cents – an important consideration for any gardener. Expert Gardener Topsoil typically costs more than basic fill dirt but less than specialized potting mixes. Here’s a breakdown based on my purchasing experience:
- 40-pound bags typically range from $2.50-$4.00 depending on location and season
- 1 cubic foot bags (approximately 25-30 pounds) range from $2.00-$3.50
- Bulk pricing (when available) might reduce costs to $30-40 per cubic yard
To put this in perspective, last year I completely renovated a 4’x8′ raised bed that required about 16 cubic feet of soil. The cost breakdown was:
- Expert Gardener Topsoil (12 cubic feet): $30
- Compost for mixing (4 cubic feet): $16
- Total cost: $46 for a bed that produced over $200 worth of vegetables
When I consider the years of productivity this investment will provide, it’s clearly worthwhile. My gardens using quality topsoil consistently outperform those with cheaper alternatives in terms of:
- Plant health and vigor
- Harvest quantity and quality
- Reduced need for fertilizers and amendments
- Lower water bills due to better moisture retention
The return on investment for quality soil is among the highest in gardening – a lesson I learned after wasting money on cheaper alternatives that led to poor results and frustration.
The Organic Question: What’s Really in the Bag?
As someone who cares deeply about what goes into my garden and ultimately onto my table, understanding the composition of my soil is important. So, is Expert Gardener Topsoil organic? The answer requires some nuance.
Expert Gardener Topsoil contains organic matter, but it is not certified organic in the way that some specialty gardening products are. From my experience and research, it typically contains:
Primary Components
- Mineral soil: The base component, providing structure and some mineral nutrients
- Organic matter: Decomposed plant materials that improve soil structure and fertility
- Sand: Added in appropriate amounts to improve drainage
- Silt and clay particles: Help with water and nutrient retention
Potential Additives
- Composted materials: Increase organic content and microbial activity
- Peat moss or coconut coir: Sometimes added to improve water retention
- Perlite or vermiculite: May be included in small amounts for aeration
- Minimal fertilizers: May contain small amounts of starter fertilizers
While not certified organic, I’ve found it to be a relatively clean product suitable for most gardening applications. For those strictly adhering to organic practices, you might consider mixing it with certified organic compost or other amendments.
During my gardening journey, I’ve become less concerned with labels and more focused on results and sustainability. Expert Gardener Topsoil has produced healthy plants with minimal inputs, which aligns with my personal gardening philosophy.
Practical Applications: How I Use Expert Gardener Topsoil
Over the years, I’ve developed several strategies for using Expert Gardener Topsoil effectively across different gardening contexts. Here’s how I apply it in various situations:
New Garden Beds
When creating new in-ground beds, I’ve found that incorporating topsoil makes a dramatic difference:
- I mark out the bed area and remove any existing vegetation
- Loosen the native soil to a depth of 6-8 inches with a garden fork
- Add a 3-4 inch layer of Expert Gardener Topsoil across the entire bed
- Mix thoroughly with the native soil using a tiller or garden fork
- Add a 1-2 inch layer of compost on top and incorporate lightly
This approach significantly improves soil structure while avoiding the “bathtub effect” that can occur when creating distinct soil layers.
Raised Beds
For raised beds, I use a different approach since we’re essentially creating an entire growing environment from scratch:
- I fill the bottom 20% of the bed with coarse organic material like small branches, leaves, or straw (a modified hugelkultur approach)
- For the main fill (60-70% of volume), I use a mix of:
- 60% Expert Gardener Topsoil
- 30% compost
- 10% vermiculite or perlite for additional drainage
- The top 10% consists of a finer growing medium of equal parts topsoil and compost
This layered approach provides excellent drainage while maintaining moisture and creating a nutrient-rich environment that improves over time.
Container Gardening
While Expert Gardener Topsoil isn’t specifically formulated for containers, I’ve used it successfully as a component in container mixes:
- For large containers and planters, I use a mix of:
- 40% Expert Gardener Topsoil
- 40% high-quality compost
- 20% perlite or vermiculite
- For smaller containers, I reduce the topsoil proportion to about 25% and increase the perlite/vermiculite for better drainage
This approach provides more weight and stability for larger containers while ensuring sufficient drainage and aeration.
Lawn Repair and Installation
For lawn projects, Expert Gardener Topsoil has become my go-to solution:
- For patching bare spots:
- I loosen the existing soil
- Add 1-2 inches of topsoil
- Seed or sod as desired
- For full lawn installation:
- Spread 2-3 inches over the prepared ground
- Grade to proper levels
- Seed or sod according to plan
The consistent texture makes grading much easier, and the improved growing medium gives grass a stronger start.
Indoor Applications: Beyond the Garden
Can Expert Gardener Topsoil work for houseplants? Based on my experiments, the answer is yes – with some modifications.
While not designed specifically for indoor use, I’ve successfully incorporated it into my houseplant routine:
Houseplant Soil Mix
For most houseplants, I create a custom mix:
- 30% Expert Gardener Topsoil (provides weight and mineral content)
- 40% coconut coir or peat moss (improves water retention)
- 20% perlite (ensures drainage and aeration)
- 10% worm castings or compost (adds nutrients)
This blend provides a more substantial base than typical houseplant mixes while maintaining the drainage necessary for indoor conditions.
Succulent and Cactus Mix
For drought-tolerant plants, I adjust further:
- 20% Expert Gardener Topsoil
- 40% coarse sand
- 30% perlite
- 10% fine gravel
- A small amount of worm castings for nutrients
This creates an extremely well-draining mix that still provides some water retention and nutrients.
Important Considerations for Indoor Use
When using topsoil indoors, I take a few extra precautions:
- I always sterilize it by baking in a shallow pan at 180°F for 30 minutes to eliminate any potential pests
- I mix thoroughly to ensure consistent texture
- I monitor moisture levels more carefully, as indoor environments lack natural rainfall patterns
While specialized potting mixes might be more convenient for indoor plants, this approach allows me to create custom blends at a lower cost, especially when potting numerous plants.
Vegetable Gardening: Food Safety and Success
Growing food is my primary gardening focus, so soil safety is paramount. After extensive use, I can confidently say that Expert Gardener Topsoil is suitable for vegetable gardening when properly applied.
Safety Considerations
From my research and experience:
- The product contains no known harmful chemicals or additives
- It’s processed to reduce contaminants
- The consistent composition reduces uncertainty compared to unknown soil sources
Vegetable-Specific Applications
Different vegetables have different soil preferences, and I’ve developed approaches for various crops:
Root Vegetables
For carrots, radishes, and other root crops, I create a looser mixture:
- 50% Expert Gardener Topsoil
- 30% compost
- 20% coarse sand
- This prevents the dense, compacted conditions that lead to forked or stunted roots
Leafy Greens
Nitrogen-hungry greens thrive in a different blend:
- 60% Expert Gardener Topsoil
- 40% well-aged compost
- A light top-dressing of additional compost mid-season
Heavy Feeders
For tomatoes, peppers, and other nutrient-demanding crops:
- Base of 70% Expert Gardener Topsoil
- 30% compost initially
- Additional compost and organic fertilizers throughout the season
I’ve found that these customized approaches yield significantly better results than a one-size-fits-all strategy.
Calculating How Much You Need: My Simple Formula
One of the most common questions I get from friends starting garden projects is, “How much soil should I buy?” Over time, I’ve developed a reliable calculation method:
For Raised Beds
- Measure length, width, and desired depth in feet
- Multiply these three numbers to get cubic feet
- Add 10% for settling
- Convert to bags based on the product size (typically 1 cubic foot per bag)
Example:
- 4′ × 8′ × 1′ deep bed = 32 cubic feet
- Add 10% (3.2 cubic feet) = 35.2 cubic feet
- With 1 cubic foot bags, you’ll need approximately 35-36 bags
For Amending Garden Beds
- Calculate the surface area (length × width)
- Determine desired depth of amendment (typically 2-4 inches or 0.17-0.33 feet)
- Multiply area by depth
- Convert to bags
Example:
- 10′ × 20′ garden with 3-inch amendment (0.25 feet)
- 10 × 20 × 0.25 = 50 cubic feet
- With 1 cubic foot bags, you’ll need 50 bags
For Containers
- Use this formula: π × r² × h (where r is the radius and h is the height)
- Convert cubic inches to cubic feet (divide by 1,728)
- Calculate for each container and add together
I keep a small notebook with these calculations for reference, which has saved me countless trips back to the garden center for “just a few more bags.”
Soil Fertility: How Expert Gardener Topsoil Affects Your Plants
While Expert Gardener Topsoil provides a good foundation, understanding its impact on soil fertility has been key to my gardening success.
Nutrient Content
From my observations and soil tests:
- It provides moderate amounts of major nutrients (N-P-K)
- Contains trace minerals at varying levels
- Offers a good starting point but requires supplementation for heavy feeders
Long-Term Fertility
Over multiple growing seasons, I’ve noticed:
- The soil structure improves year over year when amended with compost
- Microbial activity increases gradually
- Nutrient-holding capacity improves
- pH tends to stabilize in a slightly acidic to neutral range (6.0-7.0)
Signs Your Plants Need More Than Topsoil Alone
I’ve learned to watch for these indicators that additional amendments are needed:
- Yellowing lower leaves (often nitrogen deficiency)
- Purple stems or leaf undersides (phosphorus issues)
- Stunted growth despite adequate water and sunlight
- Flowering without fruiting (often calcium-related)
When these signs appear, I supplement with appropriate organic fertilizers rather than replacing the soil entirely.
Plant Compatibility: What Thrives in Expert Gardener Topsoil
Through trial and error, I’ve discovered that certain plants perform exceptionally well in Expert Gardener Topsoil, while others need additional amendments.
Excellent Performers
These plants have thrived with minimal additional inputs:
- Leafy greens (lettuce, spinach, kale)
- Root vegetables (carrots, radishes, beets)
- Annual flowers (zinnias, marigolds, sunflowers)
- Many herbs (basil, cilantro, parsley)
- Bush beans and peas
Plants Needing Amendments
These plants performed better with specific amendments:
- Acid-loving plants (blueberries, azaleas) needed added peat moss and sulfur
- Heavy feeders (tomatoes, corn) required additional compost and fertilizer
- Drought-tolerant plants (lavender, rosemary) benefited from added sand or grit
- Tropical plants needed additional organic matter and moisture retention
Understanding these preferences has allowed me to customize growing conditions while still using Expert Gardener Topsoil as my base medium.
Mixing Strategies: Blending with Other Soil Types
One of the most valuable skills I’ve developed is learning how to effectively mix Expert Gardener Topsoil with other media to create optimal growing conditions.
Mixing with Clay Soil
My backyard’s heavy clay has been transformed using this approach:
- Spread 2-3 inches of Expert Gardener Topsoil over the clay area
- Add 1 inch of coarse sand and 1 inch of compost
- Till or fork to a depth of 8-10 inches, thoroughly blending materials
- Repeat annually until desired soil structure is achieved
This gradually breaks up clay particles while building structure that resists compaction.
Mixing with Sandy Soil
For areas with excessive drainage:
- Add 3-4 inches of Expert Gardener Topsoil
- Incorporate 2 inches of compost
- Consider adding a small amount of clay (1/2 inch) if available
- Mix thoroughly and water well to settle
The topsoil’s balanced texture helps sandy soil retain moisture and nutrients that would otherwise leach away.
Creating Custom Blends
For specific plant needs, I create custom mixes:
- Woodland garden mix: 60% topsoil, 30% leaf compost, 10% pine bark
- Vegetable mix: 50% topsoil, 40% compost, 10% worm castings
- Perennial bed mix: 60% topsoil, 20% compost, 20% aged manure
These specialized blends provide targeted growing conditions while maintaining good overall soil structure.
Fertilizer Content: What’s Included and What’s Not
Understanding the fertilizer content of Expert Gardener Topsoil helps set realistic expectations and plan appropriate amendments.
Natural Nutrient Content
Based on my experience and research:
- It contains moderate amounts of naturally occurring nutrients
- The organic matter provides slow-release nutrition as it breaks down
- Mineral content varies but generally includes basic trace elements
Supplemental Fertilization
For optimal results, I’ve found these supplemental practices beneficial:
- Adding balanced organic fertilizer (like 5-5-5) at planting time
- Top-dressing with compost mid-season for heavy feeders
- Using liquid fish emulsion or compost tea for quick boosts during growth
- Applying specific amendments based on plant needs and soil tests
A simple soil test kit has been invaluable in helping me determine exactly what my garden needs beyond the baseline provided by the topsoil.
Storage Solutions: Maximizing Shelf Life
Proper storage extends the useful life of topsoil and preserves its beneficial properties. Here’s what works for me:
Short-Term Storage (1-3 months)
For partially used bags or short-term storage:
- Keep bags closed tightly to prevent moisture loss
- Store in a shaded location away from direct sunlight
- Place on pallets or bricks to prevent ground contact
- Consider transferring to sealable containers for better protection
Long-Term Storage (3+ months)
For seasonal storage:
- Transfer to heavy-duty containers with lids
- Add a small amount of water if the soil seems dry (aim for slightly damp, not wet)
- Store in a temperature-stable environment (garage or shed)
- Label with purchase date and any amendments added
Signs of Degradation
I watch for these indicators that stored soil needs refreshing:
- Musty or sour odor (indicates anaerobic conditions)
- Visible mold growth
- Extremely dry, dusty texture
- Compaction that doesn’t break apart easily
When these signs appear, I rejuvenate the soil by spreading it in a thin layer in the sun, allowing it to dry if too wet, then mixing with fresh compost before use.
Longevity: How Long Does It Last?
Understanding the lifespan of topsoil helps plan garden maintenance and investments effectively.
In Containers and Raised Beds
In my experience:
- Performance noticeably declines after 1-2 growing seasons without amendments
- With regular compost additions, can remain productive for 3-5 years
- Complete replacement is typically needed every 4-6 years for optimal results
In Ground-Level Gardens
When incorporated into existing soil:
- Benefits continue indefinitely with proper maintenance
- Annual additions of compost maintain and improve quality
- Structure improvements (better drainage, aeration) are long-lasting
Extending Useful Life
I’ve adopted these practices to maximize longevity:
- Annual addition of 1-2 inches of compost
- Cover cropping during off-seasons
- Avoiding compaction through proper garden practices
- Regular soil testing and specific amendments as needed
These approaches ensure I get the maximum return on my initial investment in quality topsoil.
Drainage Solutions: Fixing Wet Garden Problems
One of Expert Gardener Topsoil’s most valuable attributes is its ability to help resolve drainage issues – a game-changer for problematic garden areas.
For Poor Drainage Areas
I’ve successfully transformed waterlogged spots using this method:
- Remove existing soil to a depth of 8-10 inches
- Add 2 inches of coarse gravel at the bottom
- Mix Expert Gardener Topsoil with coarse sand at a 2:1 ratio
- Fill the area with this mixture, mounding slightly above surrounding grade
- Top with mulch to prevent erosion
This creates a raised, well-draining pocket that still retains enough moisture for plant growth.
For Raised Beds in Wet Areas
When dealing with generally wet conditions:
- Ensure beds have drainage holes if they have solid bottoms
- Create a base layer of coarse material (gravel or branches)
- Use a mix with higher proportions of sand and perlite
- Consider slightly elevated beds to increase distance from groundwater
These modifications transform Expert Gardener Topsoil into an excellent medium for even the most challenging wet sites.
For Container Drainage
To improve drainage in containers:
- Always use containers with adequate drainage holes
- Add a 1-inch layer of gravel or broken pottery at the bottom
- Mix topsoil with extra perlite or vermiculite (up to 30%)
- Monitor watering carefully, especially during rainy periods
These adjustments have eliminated the soggy container problems I previously struggled with.
Raised Bed Applications: My Success Story
Raised bed gardening has become my preferred method, and Expert Gardener Topsoil has been central to this success.
Why It Works Well for Raised Beds
From my experience:
- The consistent texture creates an even growing environment
- The moderate weight provides stability without excessive heaviness
- The balanced drainage properties are ideal for the confined space of raised beds
- The screened nature eliminates debris that can be problematic in small spaces
My Raised Bed Recipe
After years of experimentation, this is my go-to mix:
- 60% Expert Gardener Topsoil (provides the foundation)
- 30% quality compost (adds nutrients and biological activity)
- 10% coconut coir or peat moss (improves water retention)
- Optional: 1 cup of organic fertilizer per cubic foot of mix
This combination has consistently produced exceptional results across various plant types.
Maintenance Schedule
To keep raised beds productive:
- Add 1-2 inches of compost each spring
- Mid-season top-dressing for heavy feeders
- Full soil refresh every 3-4 years (removing 1/3 of old soil and replacing with fresh mix)
- Winter cover with mulch or cover crops to protect soil biology
This regimen maximizes the initial investment in quality materials and extends the productive life of the beds.
Ground Preparation: Setting the Stage for Success
Proper preparation before applying topsoil makes a dramatic difference in results. Here’s my time-tested approach:
For New Beds
- Remove all existing vegetation (including roots of perennial weeds)
- Loosen compacted soil with a garden fork or broadfork to a depth of 8-10 inches
- Remove large rocks, roots, and debris
- Add any necessary amendments for extreme soil conditions (lime for very acidic soil, sulfur for very alkaline)
- Level the area roughly before adding topsoil
For Existing Gardens
When rejuvenating established areas:
- Clear all plant debris and weeds
- Test soil to identify specific deficiencies
- Apply corrective amendments as needed
- Lightly till or fork to a depth of 4-6 inches
- Apply topsoil in an even layer
For Lawns
Preparation for lawn applications:
- Mow existing grass very short
- Dethatch if thatch layer exceeds 1/2 inch
- Aerate thoroughly with a core aerator
- Apply topsoil in thin layers (1/4 to 1/2 inch at a time)
- Rake to distribute evenly, filling low spots
These preparation steps significantly improve integration between existing soil and new topsoil, preventing layering issues that can impede root growth and drainage.
Conclusion: Why Quality Soil Matters
After years of gardening trials and tribulations, I’ve become absolutely convinced that investing in quality soil is the single most important factor in gardening success. Expert Gardener Topsoil has transformed my gardening experience from one of constant struggle to reliable productivity and enjoyment.
The initial cost difference between quality topsoil and cheaper alternatives is quickly offset by:
- Increased plant health and productivity
- Reduced need for fertilizers and amendments
- Lower water usage
- Less time spent fighting soil-related problems
- More consistent, predictable results
Whether you’re creating a small container garden on your patio or transforming your entire backyard into a vegetable paradise, starting with the right foundation makes every subsequent step easier and more successful.
My gardening journal from before and after switching to quality topsoil tells the story clearly – harvest weights doubled, plant diseases decreased by roughly 70%, and my water usage dropped significantly. Most importantly, my enjoyment of gardening increased immeasurably when I wasn’t constantly fighting against poor soil conditions.
So as you plan your next garden project, remember that what lies beneath the surface will ultimately determine what grows above it. Your plants’ roots – their lifeline to water and nutrients – deserve the best environment you can provide. In my experience, Expert Gardener Topsoil offers an excellent balance of quality and value that can help transform your garden dreams into reality.
Happy gardening, and may your soil be as rich as your harvests!